Understanding IPSec VPN
IPSec involves many component technologies and encryption methods. Yet IPSec’s operation can be broken down into five main steps. The five steps are summarised as follows:
| Step 1 | Interesting traffic initiates the IPSec process—Traffic is deemed interesting when the IPSec security policy configured in the IPSec peers starts the IKE process. | |
| Step 2 | IKE phase one—IKE authenticates IPSec peers and negotiates IKE SAs during this phase, setting up a secure channel for negotiating IPSec SAs in phase two. | |
| Step 3 | IKE phase two—IKE negotiates IPSec SA parameters and sets up matching IPSec SAs in the peers. | |
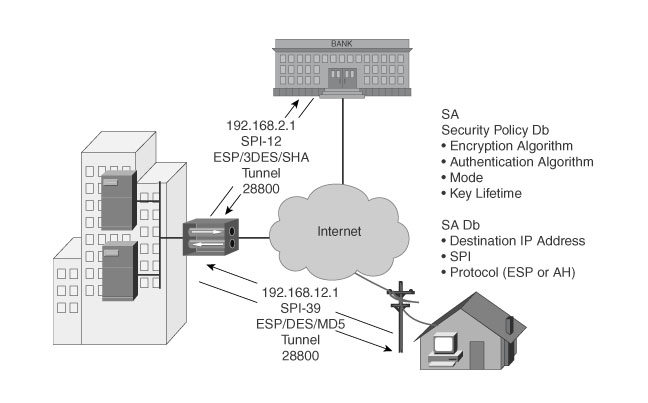
| Step 4 | Data transfer—Data is transferred between IPSec peers based on the IPSec parameters and keys stored in the SA database. | |
| Step 5 | IPSec tunnel termination—IPSec SAs terminate through deletion or by timing out. |
A crypto map—is a Cisco IOS software configuration entity that performs two primary functions. First, it selects data flows that need security processing. Second, it defines the policy for these flows and the crypto peer that traffic needs to go to. A crypto map is applied to an interface. The concept of a crypto map was introduced in classic crypto but was expanded for IPsec. This aide-memoir pulls together items from Cisco.com to provide a useful recipe and refresher.
STEP 1 (configure Interfaces):
hostname(config)#interface ethernet0
hostname(config-if)#ip address 10.10.4.100 255.255.0.0
hostname(config-if)#no shutdown
STEP 2 (configure ISAKMP) – The negotiation protocol that allows hosts to agree IPSec security associations):
Each ISAKMP negotiation is divided into two sections called Phase1 and Phase 2.
– Phase 1 creates the first tunnel, which protects later ISAKMP negotiation messages.
– Phase 2 creates the tunnel that protects data travelling across the secure connection.
IKE PHASE ONE:
The basic purpose of IKE phase one is to authenticate the IPSec peers and to set up a secure channel between the peers to enable IKE exchanges. IKE phase one performs the following functions:
- – Authenticates and protects the identities of the IPSec peers
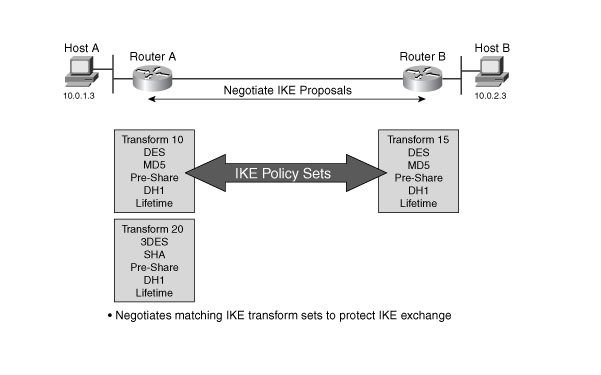
- – Negotiates a matching IKE SA policy between peers to protect the IKE exchange
- – Performs an authenticated Diffie-Hellman exchange with the end result of having matching shared secret keys
- – Sets up a secure tunnel to negotiate IKE phase two parameters
IKE phase one occurs in two modes:
- – Main mode
- – Aggressive mode
Phase 1 can take place in either Main or Aggressive mode.
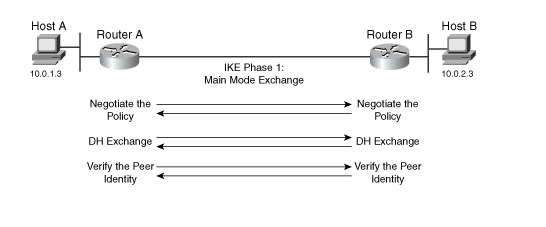
Main mode—The initiator and recipient send three two-way exchanges (six messages total) to accomplish the following services:
- First exchange (messages 1 and 2—Propose and accept the encryption and authentication algorithms.
- Second exchange (messages 3 and 4—Execute a Diffie-Hellman exchange, and the initiator and recipient each provide a pseudo-random number.
- Third exchange (messages 5 and 6)—Send and verify their identities.
The information transmitted in the third exchange of messages is protected by the encryption algorithm established in the first two exchanges. Thus, the participants’ identities are not transmitted in the clear.
Aggressive Mode—The initiator and recipient accomplish the same objectives, but in only two exchanges, with a total of three messages:
- First message—The initiator proposes the SA, initiates a Diffie-Hellman exchange, and sends a pseudo-random number and its IKE identity.
- Second message—The recipient accepts the SA; authenticates the initiator; and sends a pseudo-random number, its IKE identity, and, if using certificates, the recipient’s certificate.
- Third message—The initiator authenticates the recipient, confirms the exchange, and, if using certificates, sends the initiator’s certificate.
Because the participants’ identities are exchanged in the clear (in the first two messages), Aggressive mode does not provide identity protection.
MAIN MODE AND AGGRESSIVE MODE:

Main Mode
IKE MM has three two-way exchanges between the initiator and receiver:
- – First exchange—The algorithms and hashes used to secure the IKE communications are agreed upon in matching IKE SAs in each peer:
- – Second exchange—This exchange uses a Diffie-Hellman exchange to generate shared secret keying material used to generate shared secret keys and to pass nonces, which are random numbers sent to the other party, signed, and returned to prove their identity:
- – Third exchange—This exchange verifies the other side’s identity. The identity value is the IPSec peer’s IP address in encrypted form. The main outcome of main mode is matching IKE SAs between peers to provide a protected pipe for subsequent protected ISAKMP exchanges between the IKE peers. The IKE SA specifies values for the IKE exchange: the authentication method used, the encryption and hash algorithms, the Diffie-Hellman group used, the lifetime of the IKE SA in seconds or kilobytes, and the shared secret key values for the encryption algorithms. The IKE SA in each peer is bidirectional.
Aggressive Mode:
In the aggressive mode, fewer exchanges are done and with fewer packets. In the first exchange, almost everything is squeezed into the proposed IKE SA values, the Diffie-Hellman public key, a nonce that the other party signs, and an identity packet, which can be used to verify the initiator’s identity through a third party. The receiver sends everything back that is needed to complete the exchange. The only thing left is for the initiator to confirm the exchange. The weakness of using the aggressive mode is that both sides have exchanged information before there is a secure channel. Therefore, it is possible to sniff the wire and discover who formed the new SA. However, aggressive mode is faster than main mode.
IKE PHASE TWO:
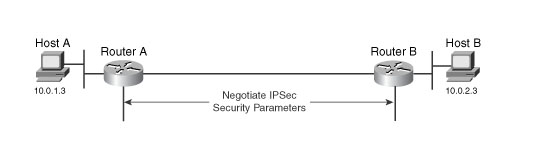
The purpose of IKE phase two is to negotiate IPSec SAs to set up the IPSec tunnel. IKE phase two performs the following functions:
- – Negotiates IPSec SA parameters protected by an existing IKE SA
- – Establishes IPSec security associations
- – Periodically renegotiates IPSec SAs to ensure security
- – Optionally performs an additional Diffie-Hellman exchange
IKE phase 2 has one mode, called quick mode. Quick mode occurs after IKE has established the secure tunnel in phase one. It negotiates a shared IPSec policy, derives shared secret keying material used for the IPSec security algorithms, and establishes IPSec SAs. Quick mode exchanges nonces that provide replay protection. The nonces are used to generate new shared secret key material and prevent replay attacks from generating bogus SAs.
Quick mode is also used to renegotiate a new IPSec SA when the IPSec SA lifetime expires. Base quick mode is used to refresh the keying material used to create the shared secret key based on the keying material derived from the Diffie-Hellman exchange in phase one.
Perfect Forward Secrecy
If perfect forward secrecy (PFS) is specified in the IPSec policy, a new Diffie-Hellman exchange is performed with each quick mode, providing keying material that has greater entropy (key material life) and thereby greater resistance to cryptographic attacks. Each Diffie-Hellman exchange requires large exponentiations, thereby increasing CPU use and exacting a performance cost.
Configuring Cisco ASA ISAKMP Policies:
To configure ISAKMP policies, in global configuration mode use the isakmp policy command with its various arguments. The syntax for ISAKMP policy commands is as follows: isakmp policy priority attribute_name [attribute_value | integer].
Set the policy to define:
hostname(config)#isakmp policy 1 authentication pre-share <=== authentication method (to ensure identity of peers)
hostname(config)#isakmp policy 1 encryption 3des <=== encryption method (to ensure privacy)
hostname(config)#isakmp policy 1 hash sha <=== Hashed Message Authentication Codes method to ensure identity of peer and message integrity
hostname(config)#isakmp policy 1 group 2 <=== A Diffie-Hellman group (establish the strength of the encryption-key-determination algorithm)
hostname(config)#isakmp policy 1 lifetime 43200 <=== A time limit for how long the ASA uses an encryption key before replacing it
hostname(config)#isakmp enable outside

STEP 3 (Create Transform Set):
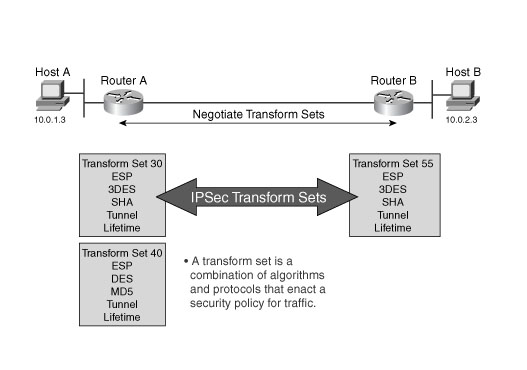
A transform set combines an encryption method and an authentication method. During the IPsec security association negotiation with ISAKMP, the peers agree to use a particular transform set to protect a particular data flow. The transform set must be the same for both peers.
A transform set protects the data flows for the access list specified in the associated crypto map entry. You can create transform sets in the ASA configuration, and then specify a maximum of 11 of them in a crypto map or dynamic crypto map entry.
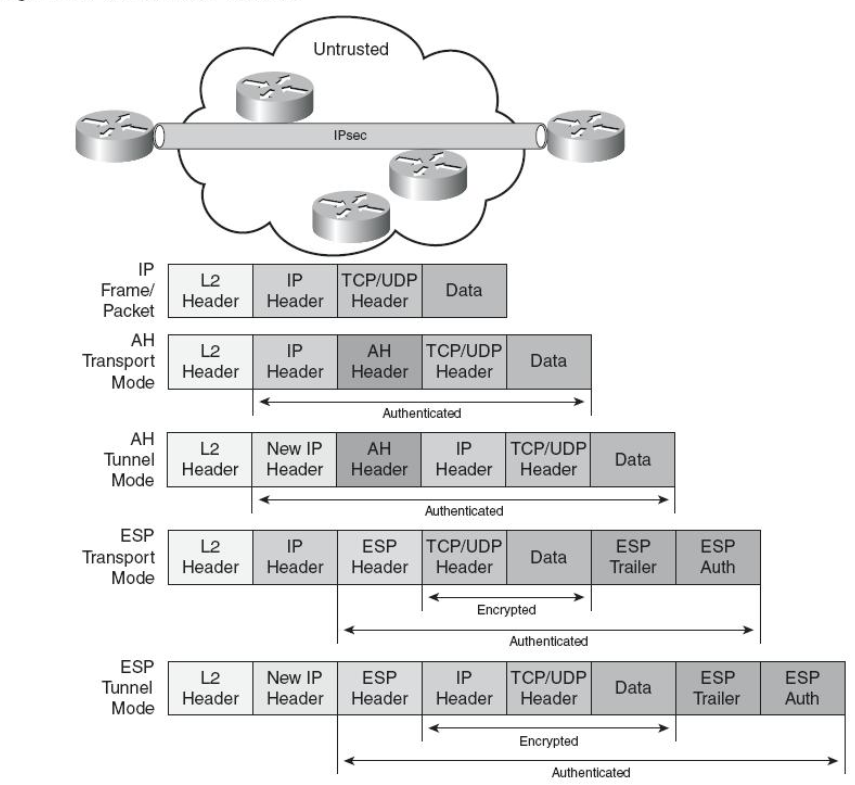
Tunnel Mode is the usual way to implement IPsec between two ASAs that are connected over an untrusted network, such as the public Internet. Tunnel mode is the default and requires no configuration.

ENCRYPTION:
Encapsulating Security Payload
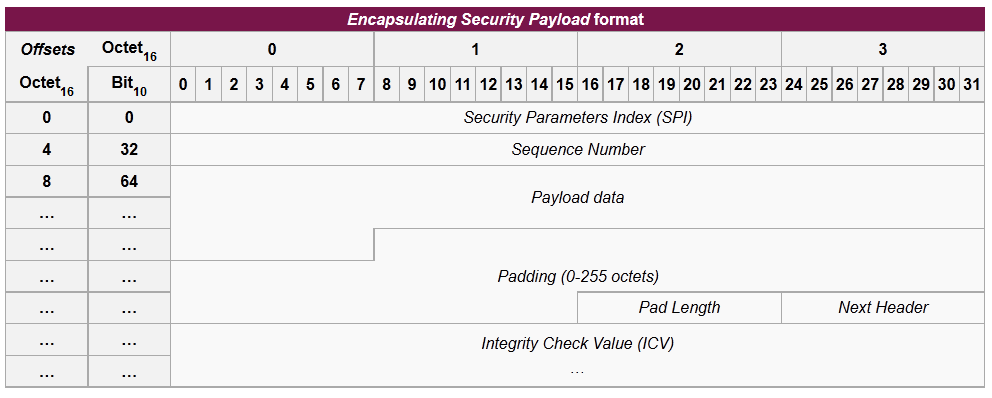
Encapsulating Security Payload (ESP) is a member of the IPsec protocol suite. In IPsec it provides origin authenticity, integrity and confidentiality protection of packets. ESP also supports encryption-only and authentication-only configurations, but using encryption without authentication is strongly discouraged because it is insecure.[15][16][17] Unlike Authentication Header (AH), ESP in transport mode does not provide integrity and authentication for the entire IP packet. However, in Tunnel Mode, where the entire original IP packet is encapsulated with a new packet header added, ESP protection is afforded to the whole inner IP packet (including the inner header) while the outer header (including any outer IPv4 options or IPv6 extension headers) remains unprotected. ESP operates directly on top of IP, using IP protocol number 50.
Valid Encryption Methods:
esp-des
esp-3des (default)
esp-aes (128-bit encryption)
esp-aes-192
esp-aes-256
esp-null
AUTHENTICATION:
In cryptography, a keyed-hash message authentication code (HMAC) is a specific construction for calculating a message authentication code (MAC) involving a cryptographic hash function in combination with a secret cryptographic key. As with any MAC, it may be used to simultaneously verify both the data integrity and the authentication of a message. Any cryptographic hash function, such as MD5 or SHA-1, may be used in the calculation of an HMAC; the resulting MAC algorithm is termed HMAC-MD5 or HMAC-SHA1
Valid Authentication Methods:
esp-md5-hmac (Hash-based message authentication code)
esp-sha-hmac
hostname(config)#crypto ipsec transform set FirstSet esp-3des esp-md5-hmac
STEP 4 (Create an ACL):
NOTE: An ACL for VPN traffic uses the translated address. These are IP Addresses Used for Access Lists When You Use NAT:
For the following features, you should always use the real IP address in the access list when you use NAT, even if the address as seen on an interface is the mapped address:
• access-group command
• Modular Policy Framework match access-list command
• Botnet Traffic Filter dynamic-filter enable classify-list command
• AAA aaa … match commands
• WCCP wccp redirect-list group-list command
The following features use access lists, but these access lists use the mapped values as seen on an interface:
• IPsec access lists
• capture command access lists
• Per-user access lists
• Routing protocols
• All other features…
hostname(config)#access-list l2l_list extended permit ip 192.168.0.0 255.255.0.0 150.150.0.0 255.255.0.0
STEP 5 (Create a Tunnel Group):
A tunnel group is a set of records that contain tunnel connection policies. You configure a tunnel group to identify AAA servers, specify connection parameters, and define a default group policy. The security appliance stores tunnel groups internally. There are two default tunnel groups in the Cisco ASA security appliance: DefaultRAGroup, which is the default IPsec remote-access tunnel group, and DefaultL2Lgroup, which is the default IPsec LAN-to-LAN tunnel group. You may modify them but you cannot delete them.
You can also create one or more new tunnel groups to suit your environment. The security appliance uses these groups to configure default tunnel parameters for remote access and LAN-to -LAN tunnel groups when there is no specific tunnel group identified during tunnel negotiation.
To establish a basic LAN-to-LAN connection, you must set two attributes for a tunnel group:
• Set the connection type to IPsec LAN-to-LAN.
• Configure an authentication method, in the following example, preshared key
To set the connection type to IPsec LAN-to-LAN, enter the tunnel-group command. The syntax is tunnel-group name type type, where name is the name you assign to the tunnel group, and type is the type of tunnel. The tunnel types as you enter them in the CLI are:
• ipsec-ra (IPsec remote access)
• ipsec-l2l (IPsec LAN to LAN)
hostname(config)#tunnel-group 10.10.4.108 type ipsec-l2l
hostname(config)#tunnel-group 10.10.4.108 ipsec-attributes
hostname(config-ipsec)#pre-shared-key 44kkaol59636jnfx
STEP 6 (Create a Crypto Map):
Crypto map entries pull together the various elements of IPsec security associations, including the following:
- – Which traffic IPsec should protect,
- – which you define in an access list.
- – Where to send IPsec-protected traffic, by identifying the peer.
- – What IPsec security applies to this traffic, which a transform set specifies.
- – The local address for IPsec traffic, which you identify by applying the crypto map to an interface.
For IPsec to succeed, both peers must have crypto map entries with compatible configurations. For two crypto map entries to be compatible, they must, at a minimum, meet the following criteria:
– The crypto map entries must contain compatible crypto access lists (for example, mirror image access lists). If the responding peer uses dynamic crypto maps, the entries in the security appliance crypto access list must be “permitted” by the peer’s crypto access list.
- – The crypto map entries each must identify the other peer (unless the responding peer is using adynamic crypto map).
- – The crypto map entries must have at least one transform set in common.
If you create more than one crypto map entry for a given interface, use the sequence number (seq-num) of each entry to rank it: the lower the seq-num, the higher the priority. At the interface that has the crypto map set, the security appliance evaluates traffic against the entries of higher priority maps first. Create multiple crypto map entries for a given interface if either of the following conditions exist:
- – Different peers handle different data flows.
- – You want to apply different IPsec security to different types of traffic (to the same or separate peers), for example, if you want traffic between one set of subnets to be authenticated, and traffic between another set of subnets to be both authenticated and encrypted. In this case, define the different types of traffic in two separate access lists, and create a separate crypto map entry for each crypto access list.
To create a crypto map and apply it to the outside interface in global configuration mode, enter several of the crypto map commands. These commands use a variety of arguments, but the syntax for all of them begin with crypto map map-name-seq-num
– In the following example the map-name is abcmap, the sequence number is 1.
hostname(config)#crypto map abcmap 1 match address l2l_list <==== (To assign an access list to a crypto map entry)
hostname(config)#crypto map abcmap 1 set peer 10.10.4.108 <==== (To identify the peer (s) for the IPsec connection)
hostname(config)#crypto map abcmap 1 set transform-set FirstSet <==== (To specify a transform set for a crypto map entry)
STEP 7 (Apply Crypto Map to Interface):
You must apply a crypto map set to each interface through which IPsec traffic travels. The security appliance supports IPsec on all interfaces. Applying the crypto map set to an interface instructs the security appliance to evaluate all interface traffic against the cryptomap set and to use the specified
policy during connection or security association negotiations. Binding a crypto map to an interface also initializes the runtime data structures, such as the security association database and the security policy database.
hostname(config)#crypto map abcmap interface outside
hostname(config)#write memory
SYSOPT SETTINGS:
One further item to verify are the sysopt settings (Cisco ASA):
The commands sysopt connection permit-ipsec and sysopt connection permit-vpn allow packets from an IPsec tunnel and their payloads to bypass interface ACLs on the security appliance. IPsec tunnels that are terminated on the security appliance are likely to fail if one of these commands is not enabled.
In Security Appliance Software Version 7.0 and earlier, the relevant sysopt command for this situation is sysopt connection permit-ipsec.
In Security Appliance Software Version 7.1(1) and later, the relevant sysopt command for this situation is sysopt connection permit-vpn.
In PIX 6.x, this functionality is disabled by default. With PIX/ASA 7.0(1) and later, this functionality is enabled by default. Use these show commands to determine if the relevant sysopt command is enabled on your device:
Cisco PIX 6.x
asa# show sysopt
no sysopt connection timewait
sysopt connection tcpmss 1380
sysopt connection tcpmss minimum 0
no sysopt nodnsalias inbound
no sysopt nodnsalias outbound
no sysopt radius ignore-secret
no sysopt uauth allow-http-cache
no sysopt connection permit-ipsec
—————–
Crypto Lingo (Vocabulary)
You need to know these terms in order to understand IPsec, and to read the rest of this document. When you see acronyms in other portions of this document, refer to this page for definitions.
Advanced Encryption Standard (AES)—AES was finalized as a Federal Information Processing Standard (FIPS)-approved cryptographic algorithm to be used in order to protect electronic data transmission (FIPS PUB 197). AES is based on the Rijndael algorithm, which specifies how to use keys with a length of 128, 192, or 256 bits to encrypt blocks with a length of 128, 192, or 256 bits. All nine combinations of key length and block length are possible.
Authentication Header (AH)—This is a security protocol that provides authentication and optional replay-detection services. AH is embedded in the data to be protected, for example, a full IP datagram. AH can be used either by itself or with Encryption Service Payload (ESP). Refer to the RFC 2402 ![]() .
.
Authentication—This is one of the functions of the IPsec framework. Authentication establishes the integrity of datastream and ensures that it is not tampered with in transit. It also provides confirmation about datastream origin.
Certification Authority (CA)—This is a third-party entity with the responsibility to issue and revoke certificates. Each device that has its own certificate and public key of the CA can authenticate every other device within a given CA domain. This term also applies to server software that provides these services.
Certificate—A cryptographically signed object that contains an identity and a public key associated with this identity.
Classic crypto—This is Cisco proprietary encryption mechanism used in Cisco IOS Software Release 11.2. Classic crypto is available in Cisco IOS Software Release 11.3. But, IPsec is not retrofitted to Cisco IOS Software Release 11.2. You can also see the name classic crypto referred to as Encryption Express or Cisco Encryption Technology (CET) in the marketing literature.
Certificate Revocation List (CRL)—This is a digitally signed message that lists all of the current but revoked certificates listed by a given CA. This is analogous to a book of stolen charge card numbers that allow stores to reject bad credit cards.
Crypto map—This is a Cisco IOS software configuration entity that performs two primary functions. First, it selects data flows that need security processing. Second, it defines the policy for these flows and the crypto peer that traffic needs to go to.
A crypto map is applied to an interface. The concept of a crypto map was introduced in classic crypto but was expanded for IPsec.
Data integrity—This is data integrity mechanisms, through the use of secret-key based or public-key based algorithms, that allow the recipient of a piece of protected data in order to verify that the data has not been modified in transit.
Data confidentiality—This is the method where protected data is manipulated so that no attacker can read it. This is commonly provided by data encryption and keys that are only available to the parties involved in the communication.
Data origin authentication—This is a security service where the receiver can verify that protected data might have originated only from the sender. This service requires a data integrity service plus a key distribution mechanism, where a secret key is shared only between the sender and receiver.
Data Encryption Standard (DES)—The DES was published in 1977 by the National Bureau of Standards and is a secret key encryption scheme based on the Lucifer algorithm from IBM. The contrast of DES is public-key. Cisco uses DES in classic crypto (40-bit and 56-bit key lengths), IPsec crypto (56-bit key), and on the PIX Firewall (56-bit key).
Diffie-Hellman—This is a method of the establishment of a shared key over an insecure medium. Diffie-Hellman is a component of Oakley, which is defined in this definition list.
DSS—A digital signature algorithm designed by The US National Institute of Standards and Technology (NIST) based on public key cryptography. DSS does not do user datagram encryption. DSS is a component in classic crypto, as well as the Redcreek IPsec card, but not in IPsec implemented in Cisco IOS software.
